TK Anatomy
Introduction
"My mission with TK Instruments has always been to create the "perfect instrument" for the highly skilled progressive musician.
Over the past three plus decades I have continuously scanned my own needs as well as the many needs of other musicians in order to create instruments that in no way hinder but actually enhance performance, technique and musicality.
Each of my handcrafted instruments is the result of these three plus decades of consistent prototyping to perfection.
None of my instruments are ever mass produced, or built with CNC machines.
By crafting my instruments in a completely hands-on manner, I can make sure that each instrument will become capable of the full expression of my art and passion.
The final result is a rather technical, yet very human feeling instrument, that brings a sense of depth, warmth and musicality to the owners of these rare specimens"
Please take the time to carefully read through this page so that you might realize the many logical benefits found in the "TK Anatomy"
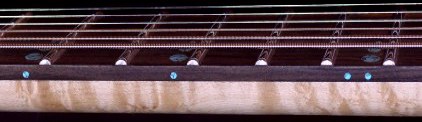
Zero radius fingerboards
Have you ever noticed how some guitars will "die out" when doing bends?
This is usually due to the fact that most instruments (guitars and basses) have radiused fingerboards.
A radiused fingerboard will "fret out" more often because when you bend a string you are actually pulling the string at an angle over a curved surface; thus causing the string to come in closer contact with the frets.
However, when you bend a string on a non-radiused fingerboard, the action remains the same, even if you were to you pull the string all the way across the board.
So one obvious benefit of having flat fingerboard would be no "fretting out" while doing bends.
Also: because the strings on a non-radiused fingerboard are all same (flat) level so you are less likely to accidentally pluck an adjacent 'higher' string or miss an adjacent 'lower' string.
Also, because 98% of all pickups are build with no radius; the non-radiused fingerboards even make more sense in regards to pickup design.
As a standard feature, I build all Guitars and Basses with flat non-radiused fingerboards.
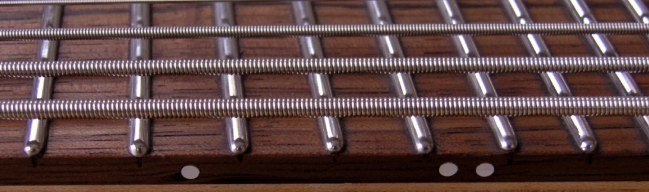
5/32" Stainless Steel Fret option
I have always loved really huge frets.
And I really like the way a scalloped fingerboard plays.
But I never really liked what scalloping does to an instrument.
It can seriously weaken a neck and make a re-fret virtually impossible.
One way that I solved this, was to create an extra large stainless steel fret that would never need replacing.
The benefits from these stainless rods are simply amazing!
The 5/32" stainless steel fret rod is approximately .075" high X .156" wide (once installed), so your fingers rarely contact the fingerboard wood (similar to a scalloped board).
The benefit is a huge reduction in the friction between your fingers and the fingerboard wood.
The results of this are amazingly effortless smooth vibrato and bends.
And because there is less fingerboard wood to keep your fingers from "digging in to the string"; two handed tapping and/or pull off techniques are drastically improved as well!
Also, the added mass associated with the 5/32" stainless steel rods noticeably increases sustain!
And if you have ever shelled out the $200+ to have your frets replaced; you will appreciate that stainless steel out lasts nickel silver frets by at least 10 times! {you will probably never wear the rods out}
I could probably fill an entire page just explaining why I love these frets so much!
I just cant recommend this option enough!
Further information on the 5/32" Stainless Frets
|
Do the 5/32" stainless rod type frets take some getting used to?
I have noticed that just a few individuals who are new to these 5/32" frets, sometimes tend to push too hard on the frets... This will of course cause the intonation to go sharp.
It seems that due to years of playing an instrument with small frets, the tactile part the brain can develop a strong familiarity to feeling fingerboard wood under the fingers; so some will occasionally get a feeling as if the action is somehow higher than that of an instrument with much smaller frets (when in fact it definitely is not).
The fact is: these frets require so much less effort to play on once your brain develops the realization that you no longer need to feel fingerboard wood underneath your fingertips.
Now most find this to be almost instant, but some may take a bit longer to get used to the feel.
My general experience has been that even the most seasoned players of standard sized frets will tend to mature into the feel of the 5/32's after a month or so (but often much less).
If you really think about it carefully, common logic will prove that these frets will improve your playing in MANY ways.
I guess that if you are a player who just loves the feel of small frets, then the 5/32's just aren't for you...
However, I can not recommend these frets enough!
They really do make such a huge difference in your technique and tone!
|

Ball-End Fret Option
With my standard fret dressing, I always remove all the sharp corners from the fret ends, so they already have a kind of "semi-hemispherical shape" to the ends.
However, if you really want that extra smooth feeling fret end; I now offer hand sculpted "ball shaped" fret ends...
|
|
Please Note:
This option is not available on the huge 5/32 Frets; those ends are very smooth as well but are done differently than standard sized frets.
|
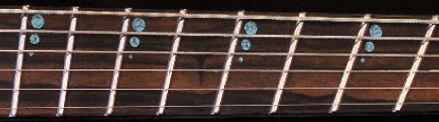
A major benefit with a Multiscaled instrument is that -everything is balanced out correctly- in that the string tension is more even from low to high due to the differing scale lengths in each string.
Because the string tension is more equally balanced; the tone is also more balanced throughout the spectrum of the instruments overall range...
The ergonomic lay out of a Multiscale fingerboard is also very balanced (natural feeling); in that your right hand falls naturally on the angle of the slanted bridge and your left hand pivots naturally with the compound fret angles on the length of the entire fingerboard.
What is the intonation like on a Multiscale fingerboard?
In general it seems to be more accurate from fret to fret compared to a standard fret layout...
Again I would use the word "balance" here.
The main reason for this is: [This may be hard to understand without the use of diagrams, so please be patient while reading this:]
The lower and the higher frets have the most extreme angles in a Multiscaled instrument:
The closer the frets are to the nut the more they angle towards the nut and the closer the frets are to the bridge the more they angle towards the bridge.
{And here is where it becomes tricky to explain!}
So these differing angles that increase towards the bridge and nut, actually increase the overall width of the fret surface thus slightly "pushing back" intonation (or slightly causing the intonation to go slightly flatter as you move towards the nut (low frets) or towards the bridge (high frets).
The closer you move towards the nut the flatter the intonation gets, the higher you move towards the bridge the flatter the intonation gets.
Now keep in mind this is VERY subtle, but it's still just enough to compensate for the ADDED TENSION needed to fret the strings in these areas.
In other words: as you play towards the bridge (high frets), the overall tension to the strings is increased due to the fact that the bridge is the highest point on the instrument.
And so these higher fretted notes require higher tension as they are pressed to a fret, thus the intonation (on a standard fretted instrument) will be slightly sharper as you move towards the bridge. because the frets on a standard instrument do NOT compensate for this additional tension.
The same rule applies to the nut: The nut is the 2nd highest tension point of action, so therefore notes played nearest to the nut will be slightly sharper on a standard fret layout.
Where as on a Multiscale fingerboard the fret intonation gradually becomes slightly flatter because the fret surface becomes slightly wider as you move either towards the bridge or away from the bridge.
If you can understand this, you will understand how it clearly proves that intonation will be slightly improved along the length of a Multiscale fingerboard.
Is a Multiscale fingerboard difficult to get used to?
"You have nothing to fear but fear itself!"
This is so true with the Multiscale fingerboards....
I have yet to hear of anyone freaking out over the way they feel, (even after playing on them for the first time!).
Even less advanced players are often impressed by the natural (balanced) ergonomic lay out of a Multiscaled instrument.
As a standard feature, I build all Guitars and Basses with multiscale fingerboards!
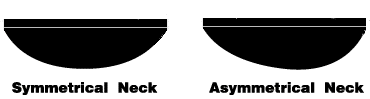
Asymmetrical Neck shape
Most traditional guitars and basses come with the standard symmetrical rounded "U" (symmetrical) shaped neck back.
This is not a bad shape, but I always felt that it did not fit the true shape of a human hand as well as it could.
Example: Try holding your hand in a position as if you were holding a guitar neck.
As you can see, the crook of your thumb and index finger (or pointer)
form more of an asymmetrical type shape...
So, to better fit in the human hand, the neck should be at it's thickest point just behind (or under) the low -E- and -A- strings at the back of the neck; rather then behind (or under) the -D- and -G- strings at the back of the neck, as seen on the traditional symmetrical shaped Guitar and Bass necks. As a standard feature, I build all Guitars and Basses with an Asymmetrical neck shape.
Optional Carbon fiber neck reinforcement
A large portion of the string's energy is absorbed into the neck.
This is due to the fact that the neck is the least rigid part on an instrument.
This can be somewhat of a good thing because the neck also needs to produce a large amount tone and resonance in response to the string's energy.
Extremely rigid woods such as hard rock maple will have increased sustain but often a very thin tone.
Where as a nice mahogany can produce a tremendous amount of resonance and tone yet lack in sustain due to it's springier response to the string's energy.
The solution to this would be to add the same rigidity to the mahogany that the hard rock maple has.
So not only do I run Carbon fiber down the length of the neck but also into the critical breaking points of the head stock area.
This gives the neck a higher amount of strength, stability, and rigidity, thus an over all increase in string energy.
The benefits include; longer sustain, less dead spots, and of course more resonance and a punchier tone.
This also works well on softer/lighter weight varieties of the Birdseye, Quilted, and Flamed Maples.
As an optional feature, I can build your Guitar or Bass with Carbon fiber reinforcement.
Note: all headless models come standard with carbon fiber reinforcement.
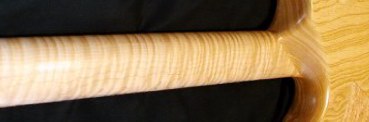
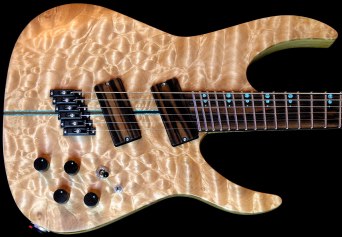
Optional Head stock construction
Over the years I have repaired many broken and fractured head stocks; so for years I have wanted to reduce this design problem that seems to be found on so many instruments.
One of the main problems with necks that have tilt back head stocks is; a combination "grain run out" and overly deep non reinforced truss rod nut cavities.
One solution is to just cut the headstock off, but not every one likes headless instruments.
So here is another way to solve these problems:
As you read in the (above) Carbon fiber section, I can optionally run Carbon fiber reinforcement into the head stock at all the critical weak points.
We can also eliminate the problems of "grain run out" within the head stock by optionally utilizing 5 different pieces of wood... This will strengthen your headstock significantly and is a highly recommended option!
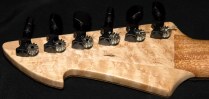
We can even optionally graft a hardwood (maple) headstock onto a softer wood (mahogany) neck (see above middle photo).
Besides the additional strength, the grafted headstock creates a slight increase in sustain (due to the added mass of a harder heavier maple) yet has little to no effect on the mahogany neck's warm resonant tone.
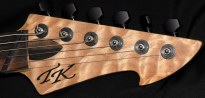
Another standard feature that should be noted on headstock construction is that the tuners are installed in a way that they slant towards the player (see above photos), for a more ergonomic way of tuning...
Neck attachment:
Some of the problems with bolt on necks are; they don't sustain as long as neck through and glue in neck instruments.
The neck screws can also come loose and then knock the whole instrument out of alignment and tune.
Also, high fret access is often hindered by the bulky heels associated with bolt on instruments.
Although neck through's have more sustain, stay in tune better and have nicely carved out heels; they do have a few issues.
If a neck through instrument has a maple neck and mahogany body wings; then 90% of the instruments tone will come from the maple and only about 10% of the tone comes from the mahogany body wings because nothing that is producing energy (I.E. the bridge) is directly attached to the wings
Because the bridge is actually mounted on the maple neck wood rather then the body's wood.
The glue in or "set neck" is really the perfect solution to the problems associated with bolt on's and neck through's.
Benefits include: the sustain and stability of a neck through; and you also you get the tone of both the body and neck wood.
The only common problem with glue in necks is they tend to have bulky heels.
However, my necks are mounted into the body in a way that allows me to sculpt away the heel to a nice smooth feel...
As a standard feature, I build all my Guitars and Basses incorporating this "set neck" style
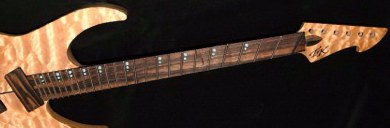
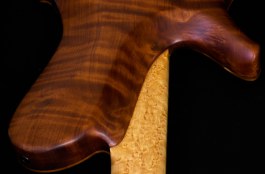
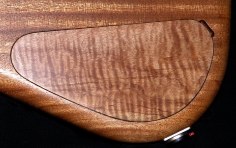
Hand sculpted heel
Here you can see how I have sculpted out the heel area
so that a musician can smoothly glissando from first position to last
while remaining completely unhindered in any way by the hand sculpted heel.
As a standard feature, I build all my Guitars and Basses with the hand sculpted "no heel feel"
Finishes:
One of the main reasons why vintage instruments sound so good is because the lacquer was applied very thinly and has mostly cracked or fallen off over the years....
Paint is basically plastic so of course the more paint used, the more it will noticeably hurt the tone of an instrument.
I agree that a nicely done 20 coat paint job looks beautiful!
However, after a few years of playing the instrument, it will become pitted, pick scratched, checked and worn through to the wood from belt buckles, jean rivets, wedding rings etc.
Anyone who owns a well played painted guitar knows what I'm talking about here....Not to mention; lacquer and other poly finishes just feel "sticky" to me.
So, after many years of trying and applying various finishes;
I have decided that a hand-rubbed teak-oil finish is my preferred choice.
This rather painstaking process leaves the instrument with a beautiful smooth natural warm glow..
I finish all my instruments with an "open grain feel" (absolutely no fillers/sanding sealers etc. are used!)
I believe that the wood should be sealed but that it should also be allowed to "breath"so that the natural tone and resonance will better project from the wood's open pores.
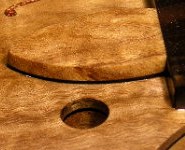
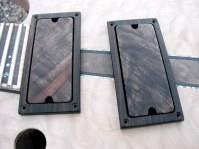
Pickup cavities.
I have found that the best tonal option for mounting pickups, is to fasten the pickups directly to the wood in the pickup cavity so that the bottom of the pickup makes tight contact with the body wood.
This allows the pickup receive the tone of the instruments resonating body wood.
You could almost compare the tone of wood mounted pickups verses plastic bezel mounted pickups, in the same way you would compare a tube amp to a solid state amp.
Basically, if the base of the pickup is mounted to the body wood of the instrument, then the pickup can produce the more organic, warm, alive tone of the instruments wood.
Some might consider it a down side that you can no longer adjust the pickup's height, but I feel it's worth the loss of adjustability.
Also, many pickups have adjustable pole pieces so you can use always those for all the adjustability you would ever need.
However, if you feel you must have full adjustability, then I would at least recommend using stacked wood veneers underneath your pickup.
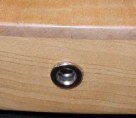
Countersunk Strap-locks:
As a nice optional detail; I started incorporating Countersunk Strap-locks onto my instruments.
Since there is nothing sticking out at the butt end of the instrument; it remains balanced when you lean it against an amplifier or a wall (as we all do from time to time), so you never have to worry about the guitar easily falling over (how many times has that happened to us all?!?) .
Plus, it's also nice that there are no protruding pins on the back upper horn to poke at you while you are trying to practice in sitting (classical) position.
I also like the "clean look" it gives to an instrument.
Wood covers
|
Optional Magnetically fastened truss rod cover
for instant access with no screws!
|
Optional veneered pickups!
Optional wood bezels!
(only available on some pickups)
|
Optional Magnetically fastened control covers for instant access with no screws!
|
I'm not really sure why so many guitars/basses that far exceed the $1500 price range, have so many plastic parts on them.
The only plastic parts you will find on my instruments are when there's just no choice in the matter.
With some pickups I can veneer the plastic tops (as seen in the above photo).
Most switch knobs are plastic as well and unfortunately there does not seem to be many alternatives there.
I have even started making my battery compartments out of wood...
So when ever possible, I try to use wood and/or metal over plastic.
Many options are available!
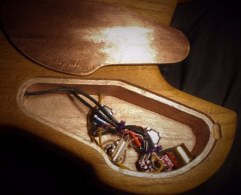
Shielding
An instrument loaded with carbon shielding paint, along with tons of electronics, definitely suffers loss within the purity of tone.
Unfortunately, carbon based shielding paints along with additional electronics, and even metal pickup plates/covers and long pole-piece screws, can cause eddy current and capacitance.
This actually cuts the high end from your tone at noticeable amounts.
I learned many years ago from vintage Strat & Tele gurus (who are such "Tone-Snobs"), that they refuse to use any body shielding at all.
But for me personally, I'd rather have a less noisy instrument though.
With that said, other than using silver or gold; copper is the best shielding material.
And so, as a standard feature (unless requested otherwise), I use copper paints and copper foils (with the non conductive adhesive backing) on all my instruments.
Neither shielding material has much (if any) effect on the purity of tone.
I also have my pickups designed in a way that there are no grounded backing plates (unless requested), and the screw pole-piece lengths are also drastically reduced.
This helps eliminate "eddy currants" and drastically improves the high end pickup tone.
Wood and Tone:
The following gets a bit "long winded", but you might find the information here very useful when deciding on your instruments wood choices...
I get asked many questions about wood and it's relation to tone...
People most often want to know what a particular wood species sounds like.
Unfortunately these types of questions are very difficult to answer.
I mean it requires a vocabulary similar to that used in wine tasting, just to describe it!
I.E. warmth, snap, muddy, brite, thin, presence, woody, airy, etc. etc...
So what does any piece of wood sound like?
To answer this, we need to ask each piece of wood!
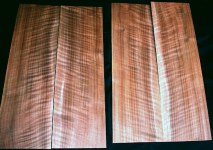
Seriously; every piece of wood I decide to use for an instrument, is first tested for tone response by placing tuning fork to the wood and listening to it's tone.
I listen to each piece of wood and I decide which side will carry tone better.
This sounds a bit odd, but some cuts of wood will actually carry tone better on one side compared to the other side.
So if one side sounds better, and if it's a body blank, then the "sweet side" becomes the top.
Or if it's going to be neck wood, then the fingerboard is placed on the "sweet side".
Some wood sounds the same on both sides so it all depends on the piece.
I believe that these "tone tests" MUST be done on each piece of wood used for an instrument because even in the same species of wood, the tone will vary greatly.
Some Mahogany's will be "brighter" (more highs) with a bit more "snap" (upper mid's) then others.
For example: a light weight piece of the same size will be warmer (lower mids) and often more resonant (louder) then a darker heavier piece of Mahogany.
However, these are just generalized guidelines to go by; as each piece has it's own unique tone in ALL species of wood.
So because of this, when I compose an instrument, I start by considering the wood tones first, then I build an instrument based on the tone the individual wood components will have as a whole.
For example: if I want a warm sounding guitar with a well balanced snappy midrange and just enough highs to add excellent definition, I will start with a very airy light weight body wood such as a nice aged light weight piece of mahogany.
Then to bring out a nice upper mid range snap, I prefer a well figured maple top plate (bird's eye, flame, quilt, etc), different figures or no figure will play a huge part in maple tone, so this is always considered.
Now depending on the tone of the body with the top glued in place, I will then make a choice of neck woods.
So if a body is still a bit in the lower mid range tone then I might prefer a maple neck.
The type (grain, cut, figure) of maple neck wood I choose, will depend on the tone of the body.
If I want more "snap" (or high mid's) then I want a harder tighter or heavier maple, so perhaps a quartered tight flame or even no figure at all, it all depends on the mid range tone I'm looking for.
Once a neck wood is established, then I look for a fingerboard wood.
This again depends upon the body wood, top wood, and now the neck wood combined.
You should also keep in mind that larger frets as well as stainless steel frets will produce a bit more highs;
so if this is a concern, then perhaps a "darker toned wood" such as Bocote or Goncolo Alves would be a preferred choice.
{although I personally -really- love the 8kHz to 20kHz tone that the stainless frets bring out of an instruments strings, just as long as it is -balanced out- with nice warm, punchy mid ranged body and/or neck woods}.
If I want even more "snap" and I am satisfied with the briteness (highs), then I will add a maple fingerboard, or maybe if I want just a bit more highs, I can add a Purpleheart fingerboard, or even an Ebony, even certain varieties of rosewood species as well have more highs then others.
Again, it's NOT just dependent on the species but the individual tone of each unique piece wood that must be considered before each instrument is assembled.
Because of space I just can't go into adhesive tone, hardware tone, and finish tone, but all these are considered when building an instrument as well.
So with each piece, not only is the tone examined for tonal superiority, but the grain stability and moisture content are also carefully examined before any specimen gets cut out into the neck, body, top and fingerboard blanks.
Now that you have read the TK Anatomy:
Perhaps you have never had the opportunity to play on an instrument with these features.
If so, please keep in mind that some of my standard features such as the multiscale fingerboards combined with the "non-radiused fingerboards" combined with the subtly carved "asymmetrical shape neck", may take just a slight bit of time in getting used to the feel...
However, most of the musicians who have played on even the fully loaded instruments with both the 5/32" stainless frets & multiscale fingerboards (even for the first time!), have very often reported back to me that the adjustment period was either instant, or at least "very brief".
This seems to be the common theme among musicians of all skill levels who have played and/or owned a TK:
once you "settle into the feel" of your TK Instrument, you soon discover an improved accuracy and articulation in your technique, along with an increased sustain, as well as a noticeably improved (much more organic) tone over many of the instruments available today.
it is my sincere desire that in taking all of the "TK Anatomy" into very careful consideration,
you have recognized the logical benefits behind these many unique design features.
And that hopefully you are now excited to begin the journey with your very own one-of-a-kind TK Instrument, then please check out the Custom Shop.
"Strat" and "Tele" is a registered trade name of Fender musical instruments is no way affiliated with TK Instruments
|